
Skip to content
Cosplay

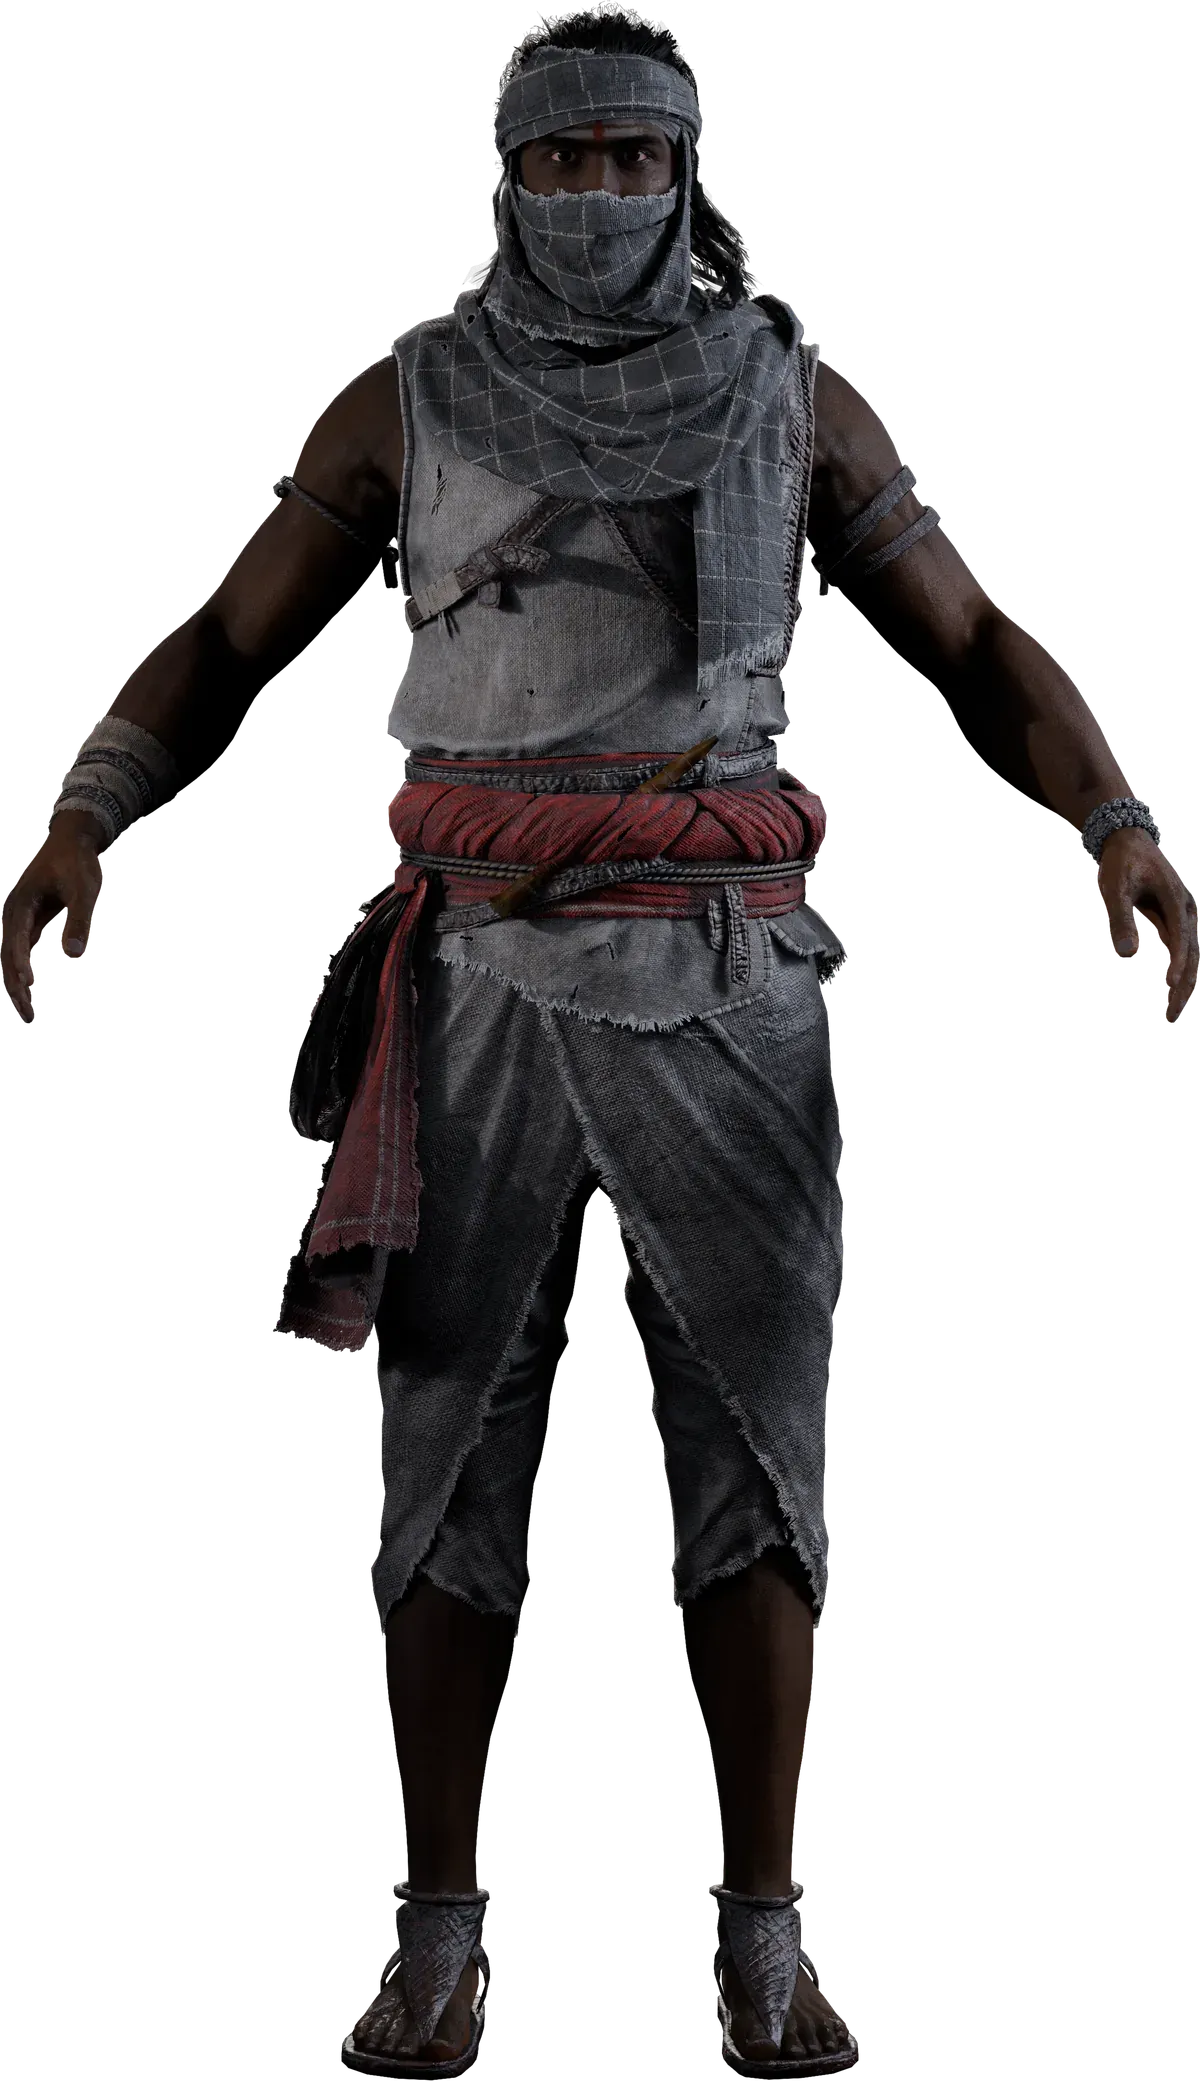
The incognito outfit

An official guide to recreating Vinna's incognito outfit and weapons.

Turnaround
Front
Back
Three-quarter A
Three-quarter B

The two three-quarter views are the most useful. They show how the chest wrap falls behind the shoulder, and how the waist cloth folds over itself.

Front Keyed
Front view of the incognito outfit, keyed 123456
  1. 1Head scarf
  2. 2Chest wrap and blade band
  3. 3Upper garment
  4. 4Waist cloth and jute rope
  5. 5Sandals
  6. 6Arms

Get the silhouette right before worrying about the details.

The costume is narrow through the chest, gets heavier and more horizontal around the waist, then falls loose to just below the knee.

The waist cloth does a lot of the work here. If it looks too thin, the whole costume will feel off.

Tip

Build the upper garment and waist cloth first. Those are the parts people will notice from across the room.

Palette Off the model
Bleached
#B9B5AE
Ash
#7C7873
Slate
#4A4744
Waist red
#6E2E2A
Brass
#8A6A3B
Char
#2E2A26
Costume zones 01 — 09
1

Head scarf

Coarse black cotton, wrapped over the head.

It's one half of a single larger piece of cloth. The other half crosses the chest.

Keep it undyed and rough. The raw edges are part of the look.

Cloth
Coarse black cotton, undyed
Cut
One piece, halved; see the chest wrap
Finish
Raw edges, no hemming
2

Vibhoothi and kumkum

Vibhoothi and kumkum are worn at the brow.

Keep the vibhoothi simple and the kumkum small. Most of the vibhoothi sits beneath the head wrap, so only part of it is visible.

Vibhoothi
Ash, drawn at the brow
Kumkum
Red, brow centre
Note
Keep it crisp. It is the tell.
3

Upper garment

Loose cotton, cut unevenly, with the seams left imperfect on purpose.

Don't make it too neat. The garment should feel made by hand and worn regularly, rather than carefully tailored. It should look a little rough around the edge.

Cloth
Loose cotton, hand-stitched
Cut
Deliberately uneven
Seams
Visible, irregular, unfinished
4

Chest wrap and blade band

The scarf's other half, worn diagonally across the torso, over a plain leather band. Keep the band simple. No buckles or visible metal fastenings.

It carries the valari(s), each wrapped in leather so they don't knock against each other.

Cloth
Second half of the head scarf
Band
Plain leather, no fastenings
Carries
Three valaris, leather-wrapped
Rule
Nothing metal where it shows
Bead arm
Wrapped arm
5

Arms

The two arms don't match.

One wrist has brown rudraksha beads, with a black thread cuff and thayathu around the forearm.

The other palm is wrapped in cloth and held in place with leather straps.

Beads
Brown rudraksha, one wrist
Palm
Cloth wrapped, leather straps
Cuff
Black thread with thayathu
6

Waist cloth

Red cloth with a white-lined border, tied deliberately bulky.

The extra bulk isn't just for shape. The surul vaal is coiled underneath, and the cloth is what keeps it hidden.

A jute rope goes over the top to hold the weapon in place and carry the pouches.

Cloth
Red, white-lined border
Tie
Bulky; the bulk is the concealment
Over
Jute rope, also the pouch hanger
Hides
The surul vaal
7

Pouches

Leather pouches, closed with an animal tooth instead of a buckle.

They hang from the jute rope at his side and carry the pellets for the blowpipe.

Body
Leather
Fastening
Animal tooth
Hung from
The jute rope at the waist
Carries
Blowdart pellets
8

Lower garment

A mundu tied in the kalari payattu style, giving him enough room to move and fight.

It's not meant to sit neatly. The folds and extra fabric are part of how it's worn.

Garment
Mundu
Tie
Trouser-style, kalari payattu
Built for
Movement, not neatness
9

Feet

Simple leather-soled sandals.

A woven strap crosses the foot, with a thin tie around the ankle.

Sole
Leather
Straps
Woven pattern
Ankle
Thin tie
Weapons 01 — 04
Pommel, cast brass yāḷi

Surul Vaal

Primary

சுருள் வாள்the coiled sword

A long, flexible blade with serrated edges on both sides. It stays coiled under the waist cloth until Vinna needs it.

This is probably the trickiest piece in the guide to get right, so take your time with it.

Blade
Long spring band, serrated along both edges
Grip
Turned hardwood, brass ferrules top and bottom
Pommel
Cast brass yāḷi head, beaded collar
Carried
Coiled under the red waist cloth, held by the jute rope
Tip: don't use steel

For cosplay, 2 mm EVA foam or upholstery webbing will give you the shape without the weight or sharp edges. Cut the serration as a repeating pattern, seal the surface, then dry-brush graphite over a black base.

Pommel
As carried

Aruvaal

Close work

அருவாள்the hooked blade

A farmer's tool with a twist. It's a curved blade with a serrated section along the inner edge. The curve is deep and the cutting edge sits on the inside. A saw-like section runs from the throat towards the middle of the blade.

Blade
Deep crescent, edge on the concave side
Teeth
Raked serrations, throat to mid-belly
Grip
Spiral-turned hardwood, warm red-brown
Pommel
Brass yāḷi head on a beaded crown collar
Carried
Tucked back-right of the sash, blade curving up
Tip

Cut it from a single 10 mm EVA sheet rather than joining segments. A seam through the middle of the blade will show immediately.

For the grip, use a wooden dowel or wrap cord tightly around a simple core and seal it. The pommel can be cast or 3D-printed.

Reverse, showing the blunt scrolled edge

Valari

Thrown

வளரிthe throwing blade

A crescent-shaped blade, thrown like a boomerang. The outer edge is sharpened, while the inner edge stays blunt and carries the scrollwork. One end has a weighted knob, while the other finishes in a squared terminal.

Span
Shallow crescent, flat section
Body
Dark forged steel, hammer texture
Edge
Sharpened on the outer curve only
Inner
Blunt, carries the chased vine scroll
Ends
Rounded knob / squared socket
Carried
Three, on the leather chest band, each leather-wrapped
Tip

Cut the shape from 12 mm EVA foam. Round the edges with a rotary tool, but bevel only the outer curve so the difference between the two edges is clear. Carve the scrollwork with a soldering iron before sealing. Finish it black, then dry-brush graphite over the raised details.

Blowpipe & dart

Optional

A turned wooden tube wrapped with cord and finished with a tassel. It sits slung behind the hip, with the darts and pellets carried separately in the pouches at the waist.

Pipe
Turned hardwood, flared mouthpiece
Binding
Maroon cord whipping, single tassel
Ends
Open at both ends, uncapped
Grip
Leather-wrapped mid-section, feather trim
Dart
Slim shaft, dark fletch, red cord at the throat
Carried
Pellets in the tooth-fastened pouches at the hip
Tip

A length of dowel, sanded and stained, will do most of the work. Keep both ends open, as shown. Make the darts from foam and keep the tips blunt.

Show us what you build

Socials

Tag @ayeletstudio on socials and we'll share your build.

Support

Need more references or angles? Email support@ayelet.studio.

Updates

We update this guide — get the latest at ayelet.studio/cosplay.

Last updated: 5 September 2026